7 Layer Salad
This is the kind of salad that makes people stop mid-conversation and ask “Wait, what IS that?” because it looks like edible art sitting on your table.
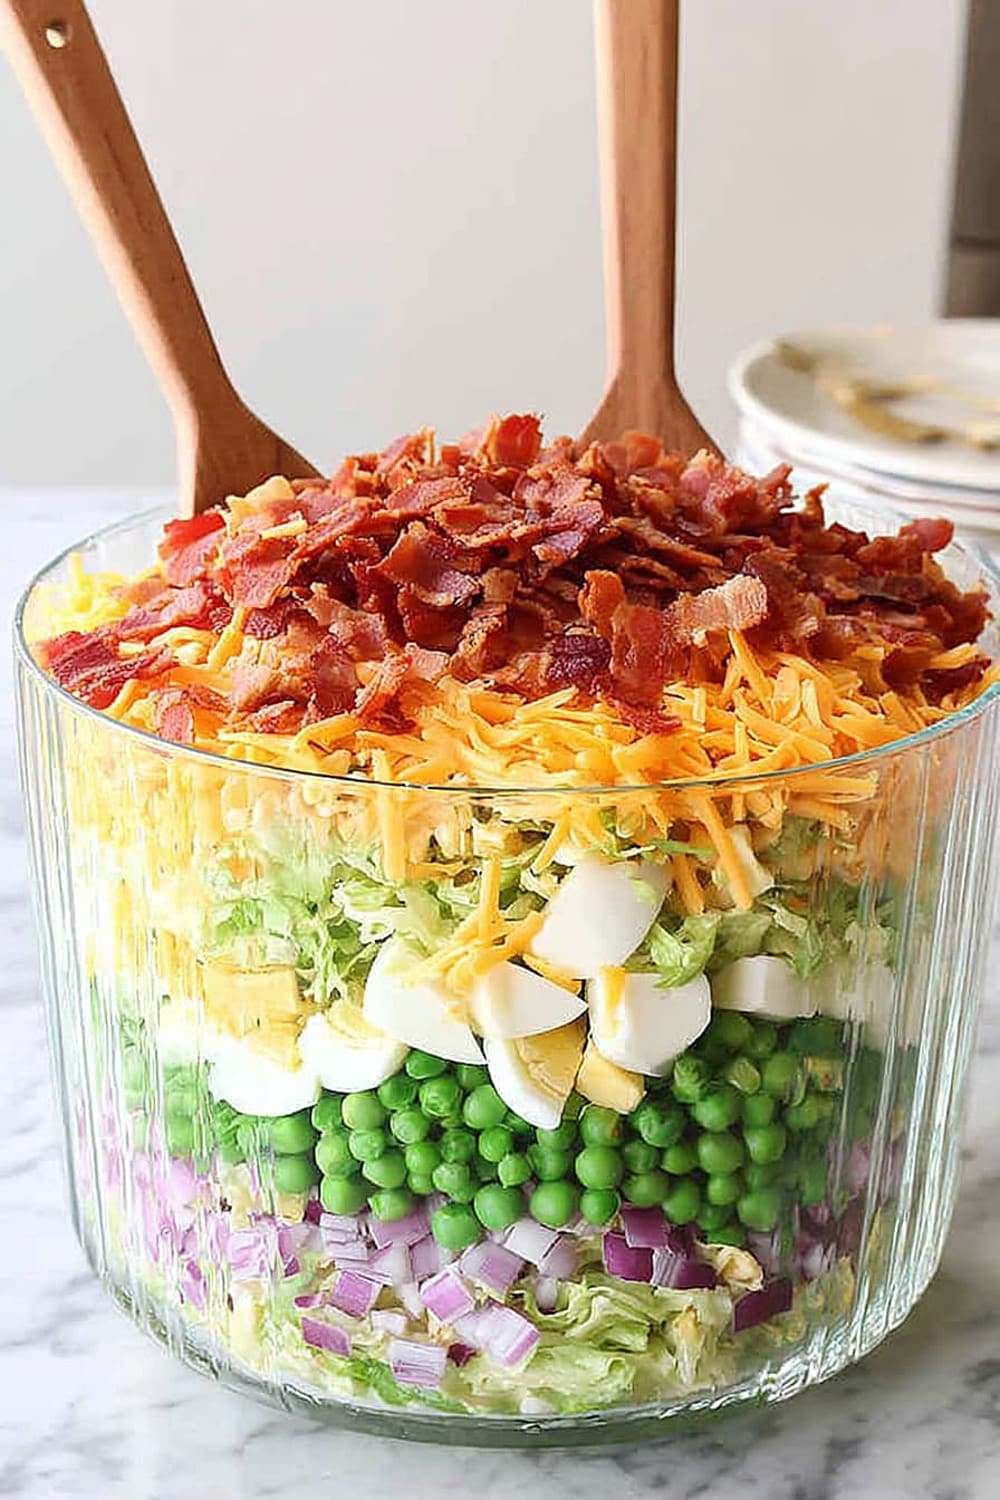
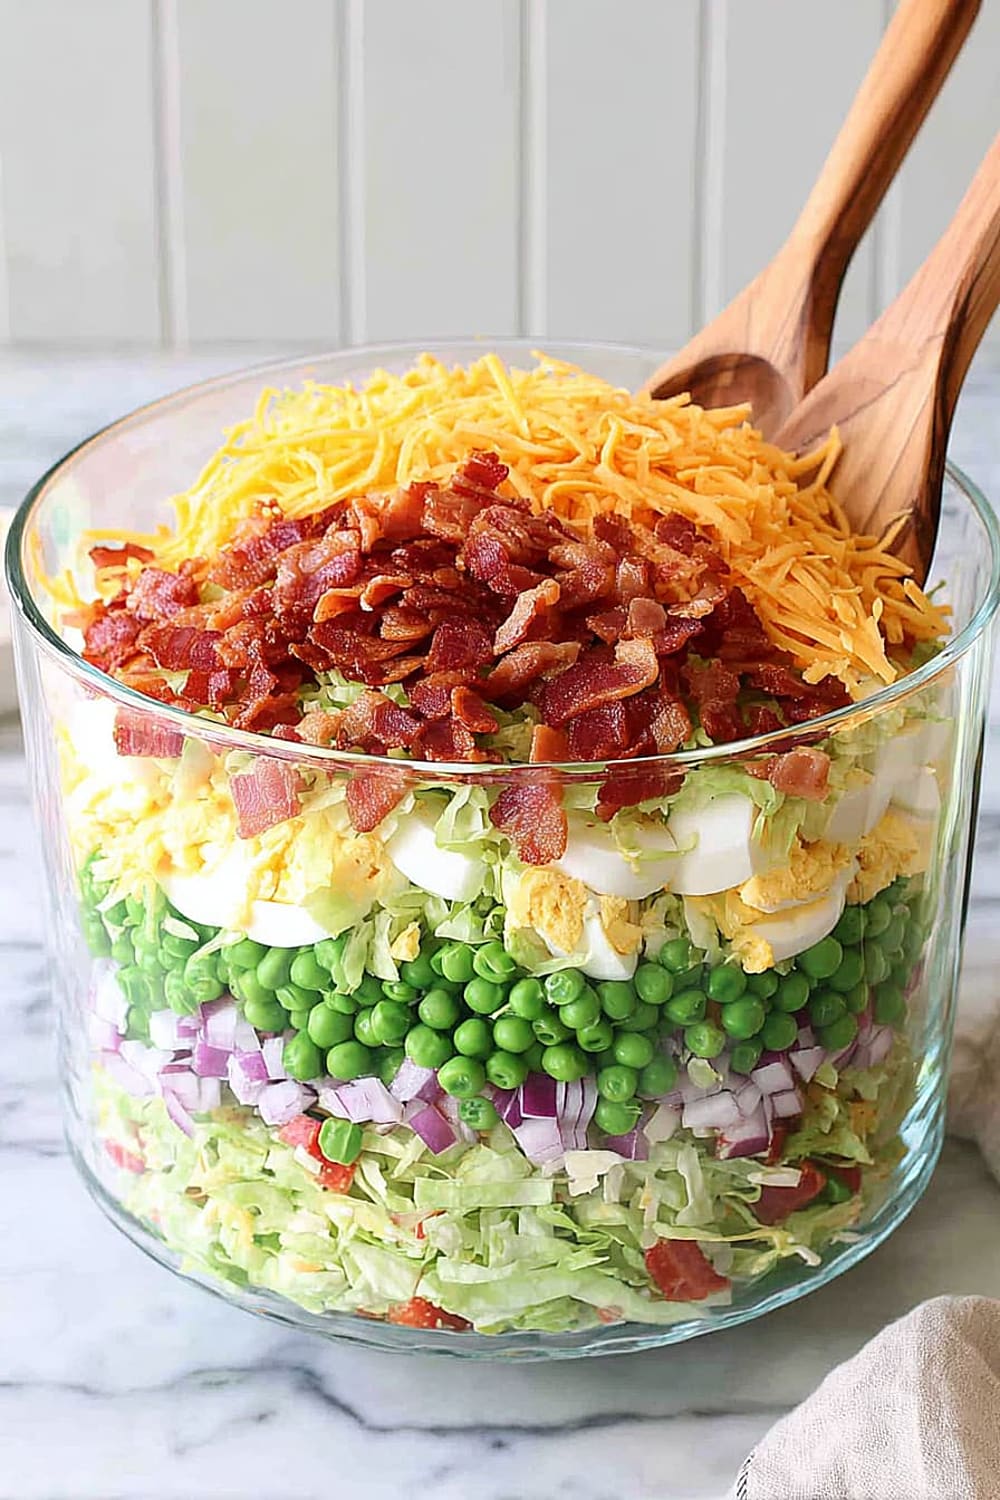
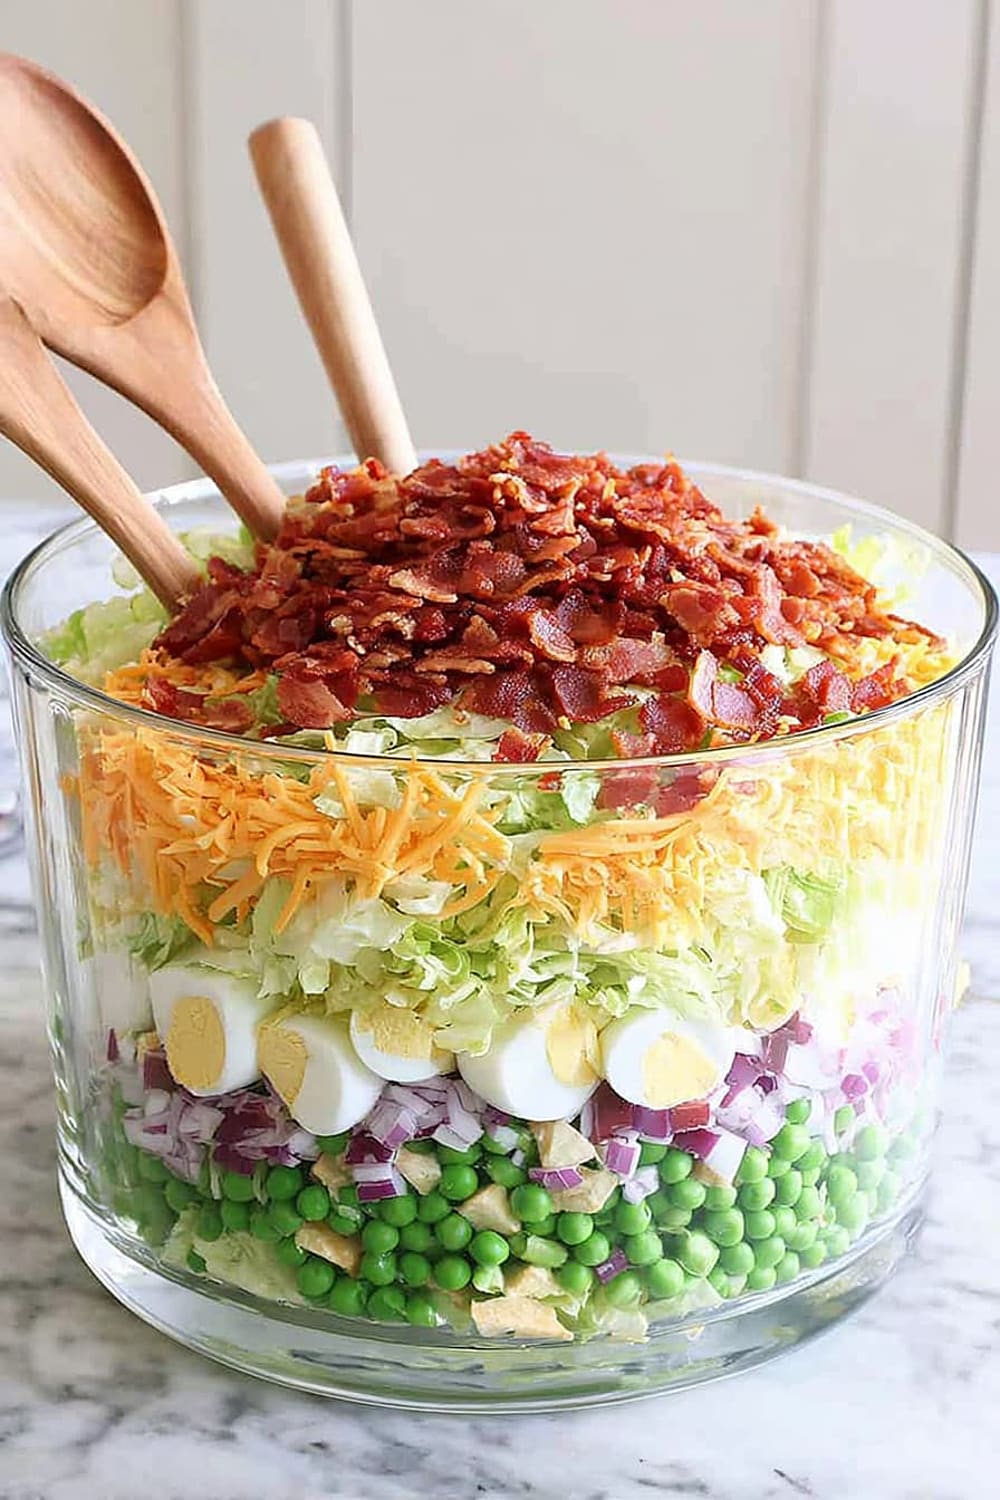
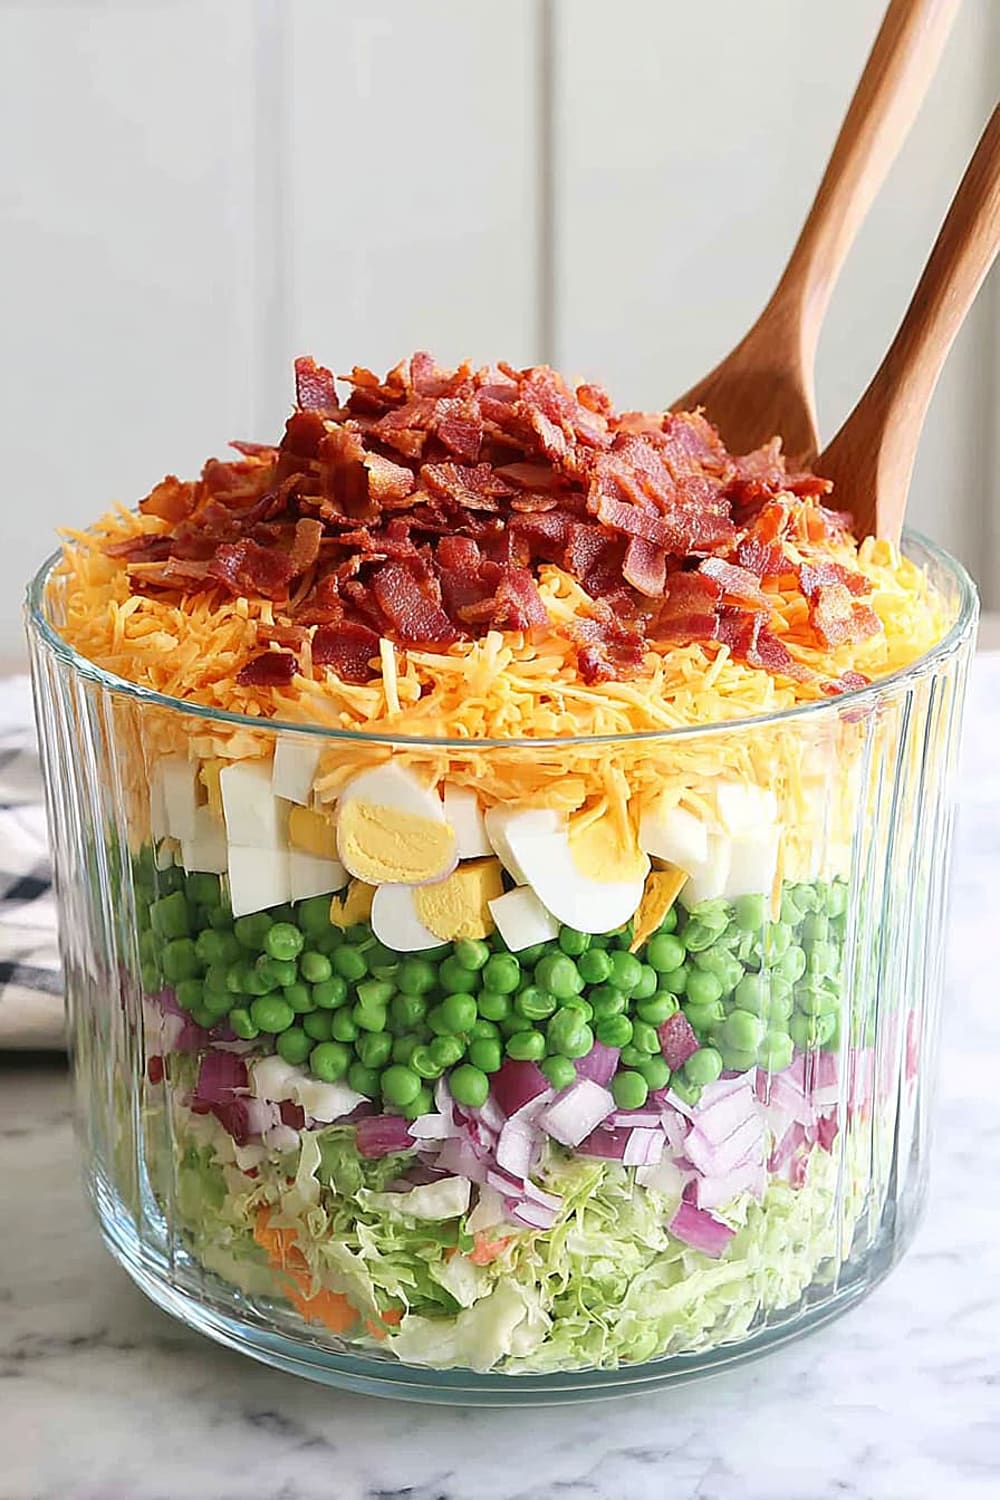
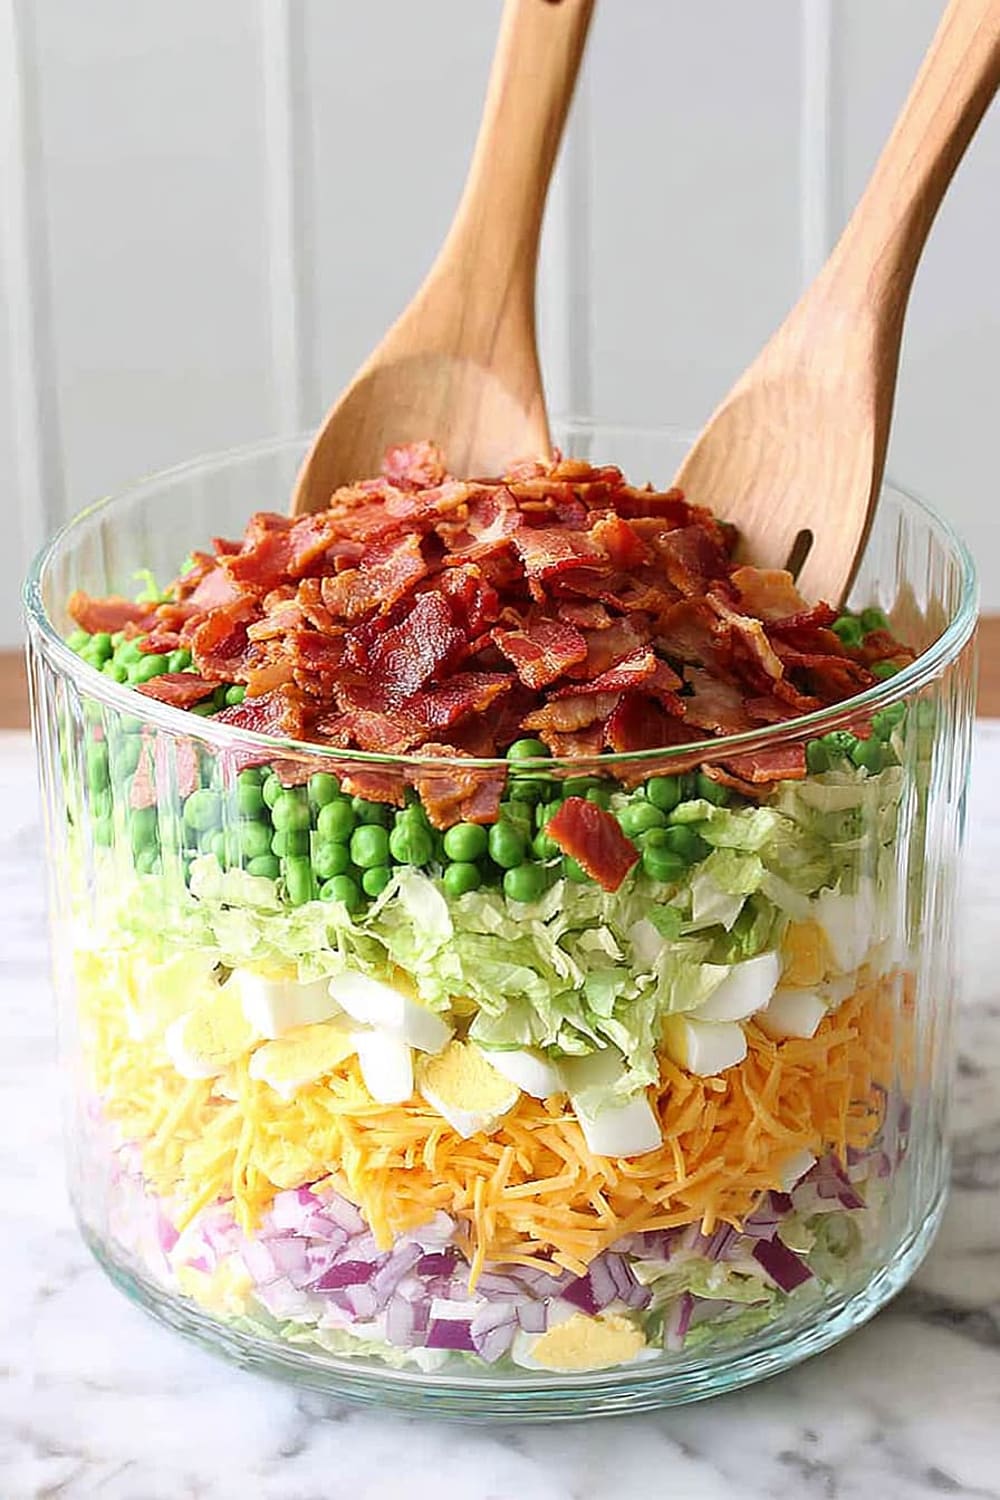
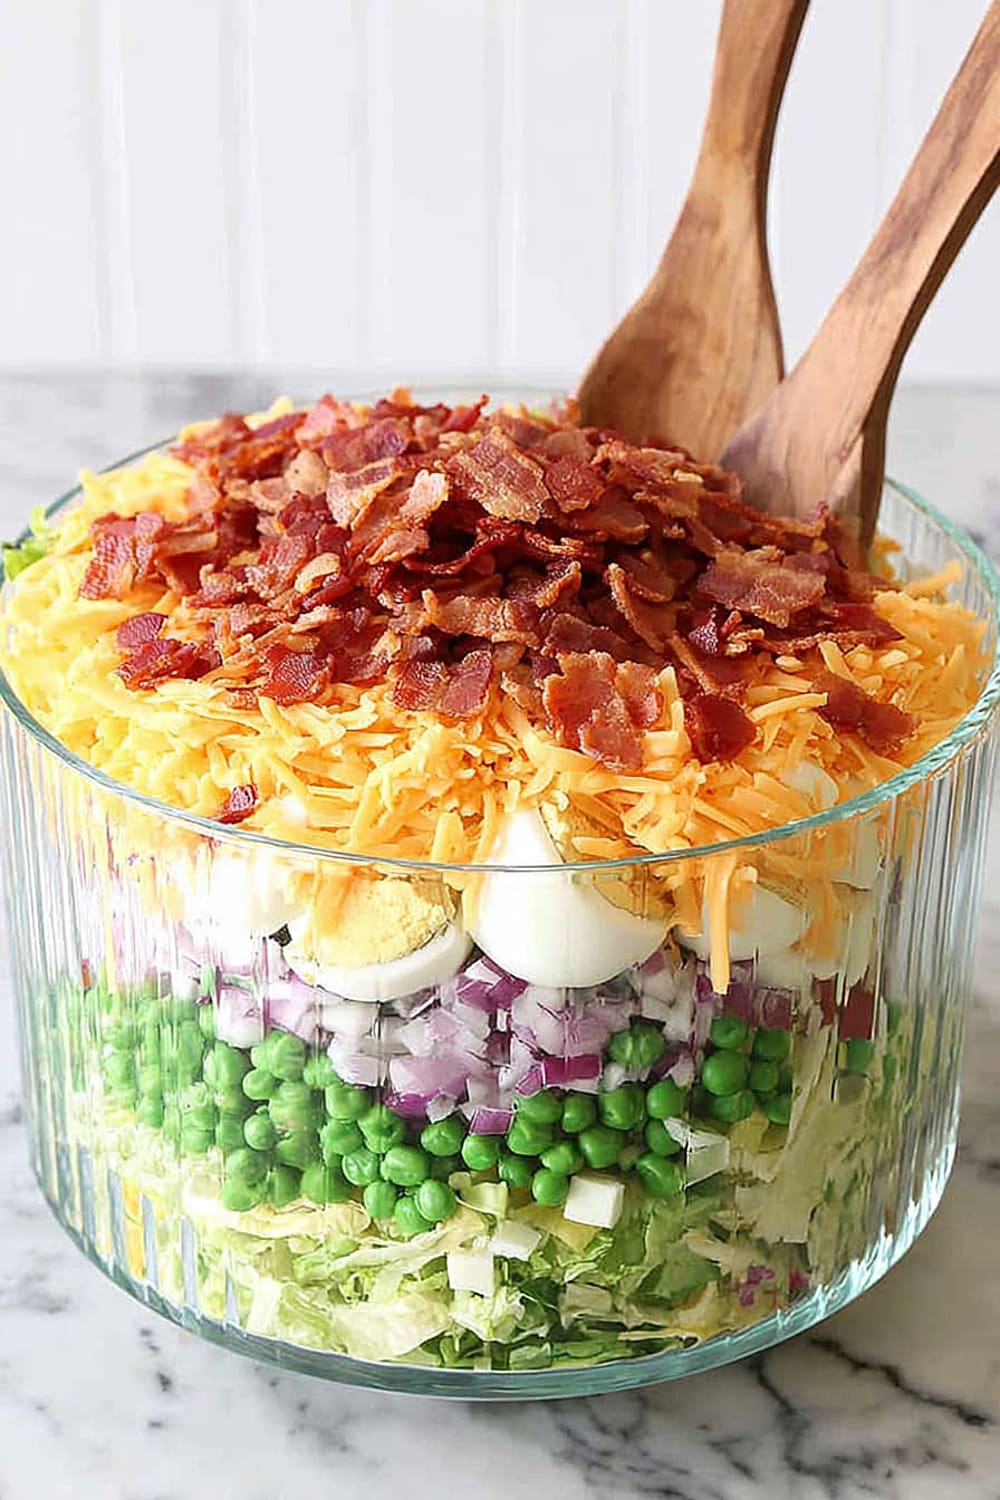
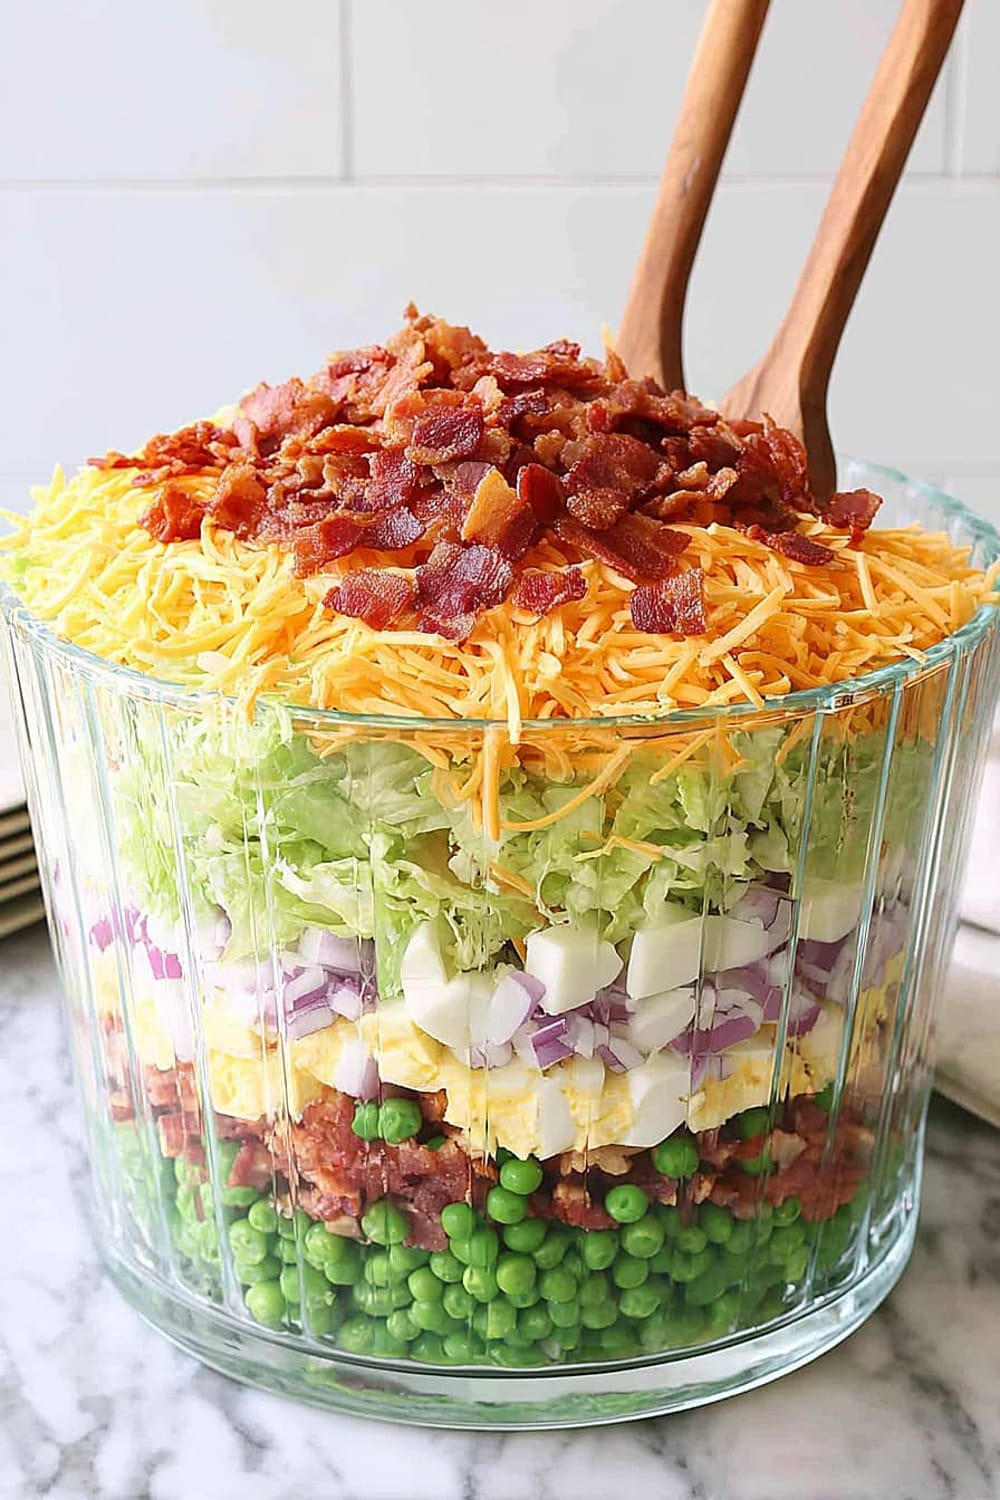
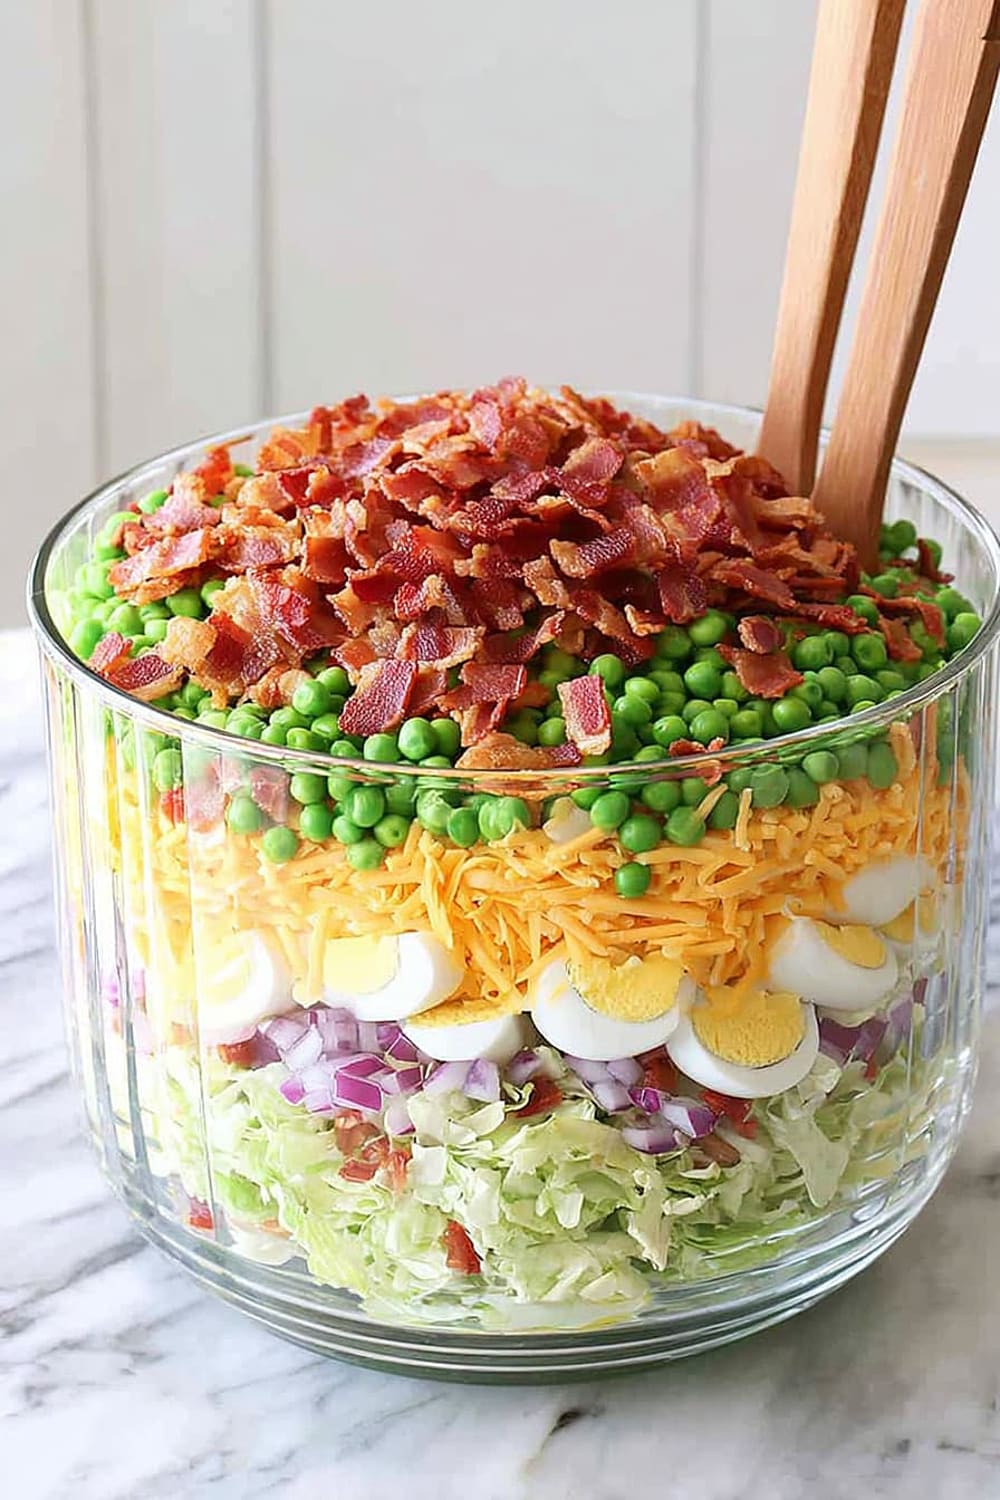
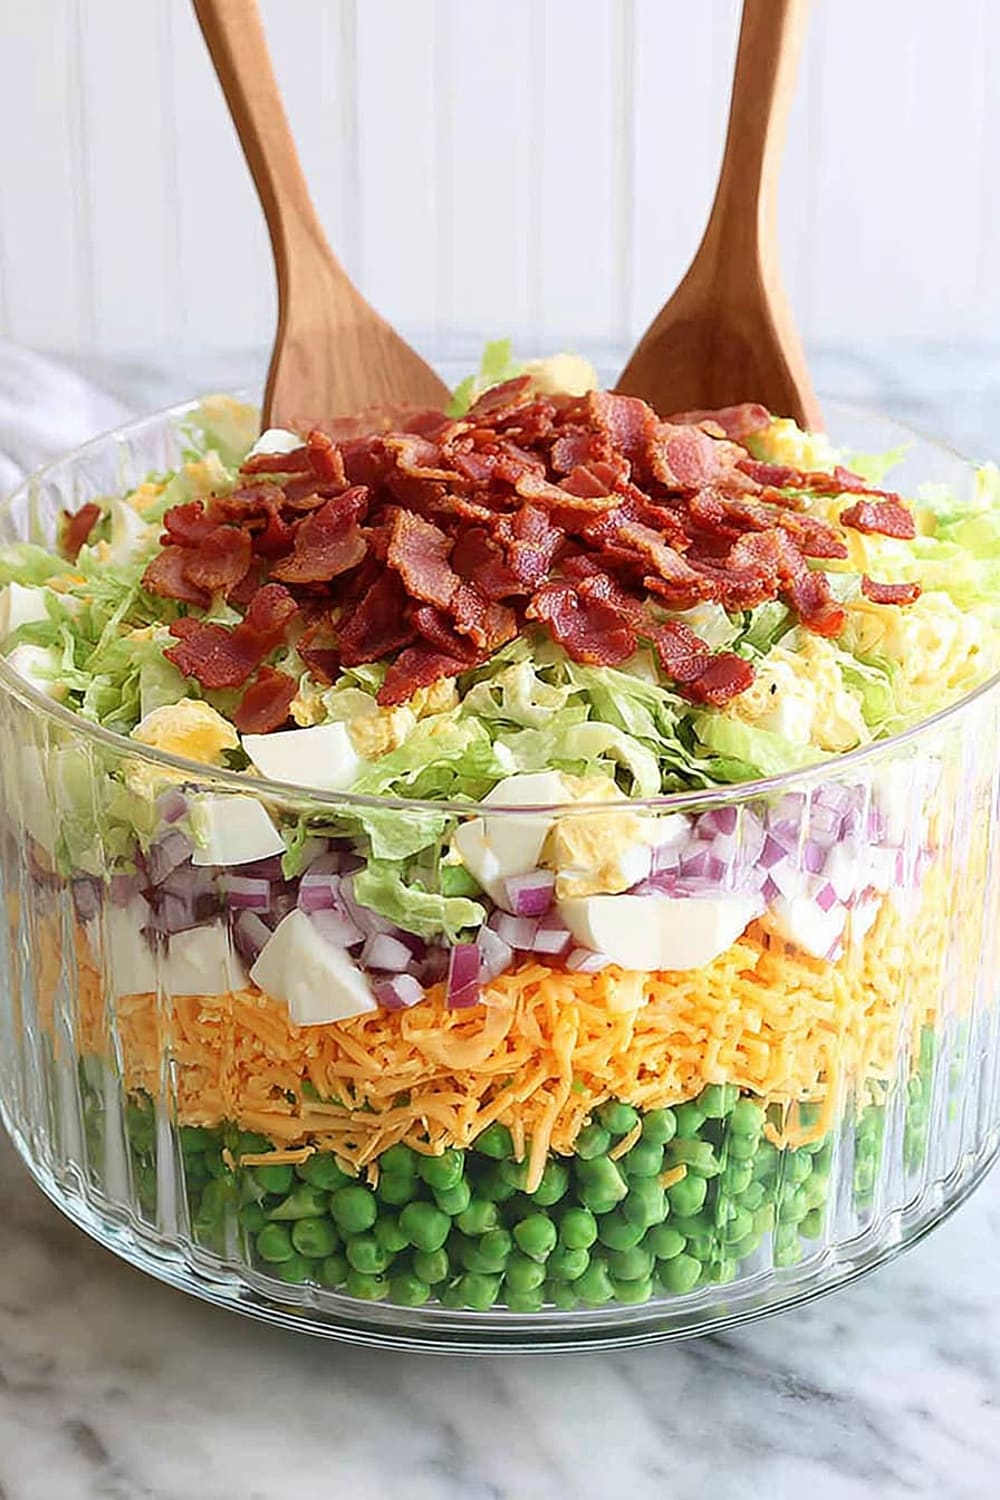
Picture this: perfectly distinct layers of crisp lettuce, vibrant peas, sharp cheddar, and crispy bacon all stacked like a delicious rainbow in a glass bowl that shows off every single gorgeous layer.
The genius of this recipe isn’t just how stunning it looks – it’s how the creamy, tangy dressing seeps down through the layers, creating flavor combinations that change with every bite.
You’ll feel like a culinary mastermind when guests realize you created this restaurant-worthy presentation in your own kitchen with ingredients you probably already have.
The best part is watching people’s faces when they take that first scoop and get a perfect bite with all seven layers – it’s like hitting the flavor jackpot every single time.
This isn’t just a salad; it’s a conversation starter, a crowd-pleaser, and proof that sometimes the most impressive dishes are also the easiest to make.
Ingredients
For the Salad Layers
- 1 head iceberg lettuce, chopped
- 10 ounces frozen peas (1 bag)
- 10 ounces cheddar cheese, shredded
- 1 red onion, chopped
- 6 hard boiled eggs, chopped
- ½ pound bacon, cooked and crumbled
For the Creamy Dressing
- 1 cup mayonnaise
- 1 cup sour cream
- 2 tablespoons sugar
- 1 tablespoon apple cider vinegar
- ½ teaspoon salt
- ¼ teaspoon black pepper
Instructions
Prepare the Dressing
- 1 In a medium mixing bowl, whisk together 1 cup mayonnaise, 1 cup sour cream, and 2 tablespoons sugar until completely smooth and no lumps remain.
- 2 Add 1 tablespoon apple cider vinegar, ½ teaspoon salt, and ¼ teaspoon black pepper, whisking vigorously until the dressing is perfectly creamy and well combined.
- 3 Cover the bowl with plastic wrap and refrigerate the dressing while you prepare the remaining ingredients – this 15-20 minute chilling time allows the flavors to meld together beautifully.
Prepare the Ingredients
- 4 Cook ½ pound bacon in a large skillet over medium heat for 8-10 minutes, turning occasionally until crispy and golden brown, then drain on paper towels and crumble into bite-sized pieces.
- 5 If you don’t have pre-cooked hard boiled eggs, place 6 eggs in a saucepan, cover with cold water by 1 inch, bring to a boil, then remove from heat and let sit for 12 minutes before cooling in ice water.
- 6 Chop the hard boiled eggs into small, uniform pieces using a sharp knife or egg slicer for consistent texture throughout each layer.
- 7 Finely chop 1 red onion into small pieces – aim for pieces about ¼ inch in size so they distribute evenly and don’t overpower any single bite.
Assemble the Layers
- 8 Select a clear glass bowl that’s at least 3 quarts in capacity – the transparency is crucial for showcasing the beautiful layers, and the size ensures room for all ingredients.
- 9 Begin with the chopped iceberg lettuce as your base layer, spreading it evenly across the bottom of the bowl and gently pressing down to create a solid foundation.
- 10 Add the chopped red onion as your second layer, distributing it evenly over the lettuce without mixing the layers together.
- 11 Sprinkle the frozen peas directly from the bag as the third layer – no need to thaw them first, as they’ll soften perfectly from the dressing and other ingredients.
- 12 Create the fourth layer with the chopped hard boiled eggs, spreading them evenly and ensuring good coverage across the entire surface.
- 13 Carefully spoon the chilled dressing over the eggs as the fifth layer, using a large spoon to distribute it evenly without disturbing the layers beneath.
- 14 Add the shredded cheddar cheese as the sixth layer, creating an even blanket of cheese that will help seal in the flavors below.
- 15 Finish with the crumbled bacon as the seventh and final layer, distributing it evenly for the perfect salty, crispy topping that makes every bite irresistible.
Recommended Equipment and Kitchen Tools
Essential Tools (for best results)
- Large glass bowl (3-4 quart capacity) – This is absolutely crucial for the visual impact, as the clear sides showcase each distinct layer beautifully
- Sharp chef’s knife – Essential for cleanly chopping the lettuce, onions, and eggs without crushing or bruising the ingredients
- Large mixing bowls – You’ll need several for prepping ingredients separately and keeping the layers organized before assembly
- Wire whisk – Creates the smoothest, most professional dressing texture by properly incorporating all ingredients without lumps
Helpful Upgrades
- Kitchen scale – Ensures precise measurements for consistent results, especially helpful when doubling or tripling the recipe for large gatherings
- Mandoline slicer – Creates perfectly uniform onion pieces for professional presentation and even flavor distribution
- Egg slicer – Produces consistently sized egg pieces that layer beautifully and look restaurant-quality in the final presentation
Nice-to-Have Options
- Glass serving spoons – Maintain the elegant presentation when serving and help guests scoop straight down through all layers
- Individual glass bowls – Perfect for creating personal-sized portions that showcase the layers just as beautifully as the large version
Recipe Variations and Dietary Modifications
Classic Variations
- Southwestern Style – Replace cheddar with pepper jack cheese, add a layer of black beans, and include diced tomatoes and jalapeños for a spicy kick
- Garden Fresh – Add layers of diced cucumbers, cherry tomatoes, and fresh herbs like dill or chives for extra crunch and flavor
- Protein Power – Include a layer of diced ham, turkey, or grilled chicken between the eggs and dressing for a heartier meal
Dairy-Free Modifications
- Cheese Substitute – Use nutritional yeast mixed with cashew cream, or try dairy-free cheddar shreds for the cheese layer
- Dressing Alternative – Replace sour cream with cashew cream or dairy-free yogurt, and use vegan mayonnaise for the creamy base
- Flavor Enhancement – Add extra herbs and spices to compensate for the reduced richness from dairy alternatives
Lower-Carb Adaptations
- Veggie Base – Replace some lettuce with chopped cauliflower or broccoli for extra nutrients and fewer carbs
- Dressing Modification – Reduce or eliminate the sugar in the dressing, using stevia or monk fruit sweetener if desired
- Protein Boost – Double the eggs and bacon while reducing the higher-carb vegetables for a more keto-friendly version
Make-Ahead Friendly
- Prep Components – All ingredients can be prepared up to 24 hours in advance and stored separately before final assembly
- Assembly Timing – The salad actually improves when assembled 2-4 hours before serving, allowing flavors to meld perfectly
Nutritional Information and Health Benefits
Key Nutritional Highlights
This 7-layer salad provides approximately 285 calories per serving when divided among 12 people, with a balanced macronutrient profile featuring 18 grams of fat, 12 grams of carbohydrates, and 14 grams of protein. The combination of eggs and bacon delivers high-quality complete proteins, while the vegetables contribute essential fiber and micronutrients. The frozen peas add a surprising 4 grams of fiber and plant-based protein to each serving.
Health Benefits of Main Ingredients
The iceberg lettuce provides hydration and folate, while the hard boiled eggs deliver all nine essential amino acids plus choline for brain health and selenium for immune function. Frozen peas retain their nutritional value exceptionally well, offering vitamin K for bone health, vitamin C for immune support, and antioxidants like lutein for eye health. The red onion contributes quercetin, a powerful anti-inflammatory compound, plus sulfur compounds that support cardiovascular health.
Dietary Considerations
This recipe contains eggs, dairy, and mayonnaise, making it unsuitable for those with these specific allergies. The high sodium content from bacon and cheese means those monitoring sodium intake should enjoy smaller portions. However, the salad provides excellent vitamin A from the eggs, calcium from the cheese, and potassium from the vegetables, making it a nutritionally dense option when enjoyed as part of a balanced diet.
Smart Swaps and Ingredient Substitutions
Common Substitutions:
- Iceberg lettuce → Romaine or butter lettuce for more nutrients and flavor, or chopped cabbage for extra crunch and longer storage life
- Frozen peas → Fresh blanched peas, corn kernels, or diced bell peppers for different textures and seasonal availability
- Cheddar cheese → Swiss, Colby, or Monterey Jack for varied flavor profiles, or crumbled feta for a tangy Mediterranean twist
- Red onion → Green onions, shallots, or sweet yellow onion depending on desired intensity and availability
Budget-Friendly Swaps:
- Bacon → Ham pieces, turkey bacon, or even seasoned sunflower seeds for the salty, crunchy element at a fraction of the cost
- Sour cream → Greek yogurt mixed with a splash of lemon juice for similar tanginess with added protein and probiotics
- Fresh hard boiled eggs → Canned or pre-cooked eggs when time is more valuable than cost savings
Pantry Emergency Substitutions:
- Apple cider vinegar → White vinegar or lemon juice for the acidic component that balances the rich dressing
- Mayonnaise → Mashed avocado mixed with lemon juice for a healthier fat source, though the flavor will be notably different
- Sugar → Honey or maple syrup (use half the amount) for natural sweetening that complements the tangy dressing
Pro Tips for Substitutions:
- When substituting cheeses, stick to similar melting properties and fat content for consistent dressing distribution
- Root vegetables like carrots or radishes can replace onions but should be grated rather than chopped for proper integration
Make It Diabetes-Friendly
Sugar Substitutions:
- Replace the 2 tablespoons sugar with 1 tablespoon erythritol or stevia blend to reduce carbs by approximately 24 grams total
- Monk fruit sweetener works exceptionally well in this dressing, using just 1 teaspoon to achieve the same sweetness level
- The natural sweetness from the peas and carrots (if added) can often eliminate the need for added sweeteners entirely
Carb Reduction Strategies:
- Reduce peas to ½ cup and add diced cucumbers or bell peppers to maintain volume while cutting 8 grams of carbs
- Replace half the lettuce with chopped cauliflower or broccoli for extra fiber and nutrients with minimal carb impact
- Increase the protein ratio by adding an extra 2 hard boiled eggs and 2 ounces of bacon to improve satiety and blood sugar stability
Portion & Timing Tips:
- Ideal serving size: ¾ cup per person provides approximately 8-10 grams of carbs with modifications
- Pair with grilled chicken or salmon to create a complete meal that minimizes blood sugar spikes
- Serve as a side dish with lean protein and healthy fats to slow carbohydrate absorption
Total Carb Reduction: These modifications reduce carbs from 12 grams to 6-8 grams per serving while maintaining the recipe’s signature appearance and satisfying taste.
Perfect Pairing Suggestions
Beverage Pairings
A crisp Sauvignon Blanc or Pinot Grigio complements the creamy dressing and cuts through the richness of the bacon and cheese beautifully. For beer lovers, a light lager or wheat beer provides refreshing contrast without overwhelming the delicate vegetable flavors. Sparkling water with lemon or unsweetened iced tea offer excellent non-alcoholic options that cleanse the palate between bites. During summer gatherings, fresh lemonade or cucumber water echoes the salad’s refreshing qualities perfectly.
Side Dish Recommendations
This salad pairs wonderfully with grilled chicken breast, barbecue ribs, or pulled pork for hearty main courses that complement the creamy, tangy flavors. Cornbread or dinner rolls provide comforting carbohydrates that soak up the delicious dressing. Grilled corn on the cob and baked beans create a classic American picnic spread that highlights the salad’s retro charm. For lighter options, grilled vegetables or fresh fruit salad add color and nutritional balance to the meal.
Complete Meal Ideas
Build a perfect backyard barbecue menu with grilled burgers, this layered salad, potato salad, and fresh watermelon. For potluck dinners, pair it with fried chicken, mac and cheese, and coleslaw for a crowd-pleasing Southern-inspired feast. Holiday gatherings benefit from serving this alongside honey ham, green bean casserole, and dinner rolls for a meal that satisfies all generations.
Occasion Suggestions
This salad shines at summer picnics, church potlucks, and family reunions where its make-ahead convenience and crowd-pleasing appeal make hosting effortless. Casual dinner parties benefit from its impressive presentation, while holiday buffets appreciate its ability to feed large groups without last-minute preparation stress.
Pro Tips and Troubleshooting
Professional Assembly Techniques
Use a clear glass trifle bowl or straight-sided glass bowl to showcase the layers most dramatically – curved sides can distort the visual impact. Press each layer gently with the back of a spoon to create clean, distinct boundaries between ingredients. Chill the assembled salad for at least 2 hours before serving to allow the dressing to penetrate the layers while maintaining their visual separation. Wipe the bowl sides with a damp paper towel after adding each layer to keep the glass crystal clear for presentation.
Common Mistakes and Solutions
Avoid over-mixing when adding the dressing – pour it evenly over the surface and let gravity do the work to prevent muddy layers. Don’t thaw frozen peas before adding them, as they’ll release excess water and make the salad soggy. Pat bacon completely dry after cooking to prevent grease from pooling and affecting the dressing consistency. Use day-old lettuce rather than freshly washed to ensure it’s completely dry and won’t dilute the dressing.
Storage and Make-Ahead Strategies
This salad actually improves after 4-6 hours in the refrigerator as flavors meld together beautifully. Cover tightly with plastic wrap and refrigerate for up to 48 hours – the layers will soften slightly but maintain their distinct flavors. Prepare all components separately up to 24 hours in advance and assemble just before serving for maximum visual impact. Scale the recipe easily by maintaining the same proportions – it works perfectly for 6 people or 24 people with identical results.
This 7-layer salad proves that sometimes the most impressive dishes are also the most approachable, delivering restaurant-quality presentation with ingredients you probably already have in your kitchen, making it the perfect recipe to master for any occasion that calls for something both beautiful and delicious.