Church Window Cookies

These colorful no-bake treats are about to become your secret weapon for looking like a baking genius without actually turning on your oven.
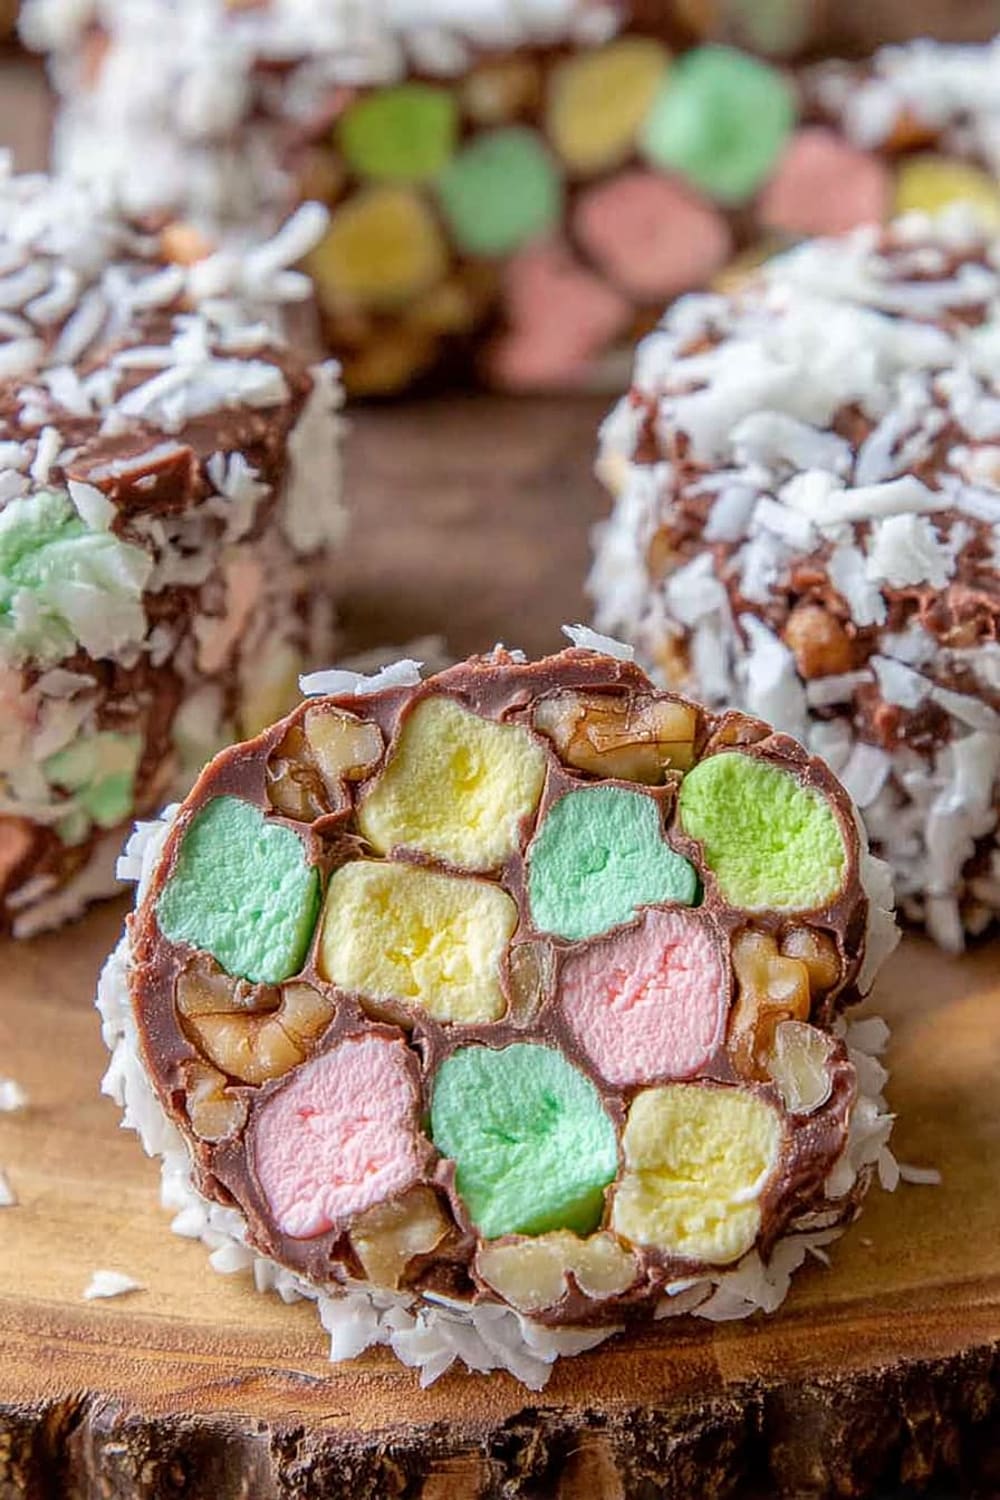
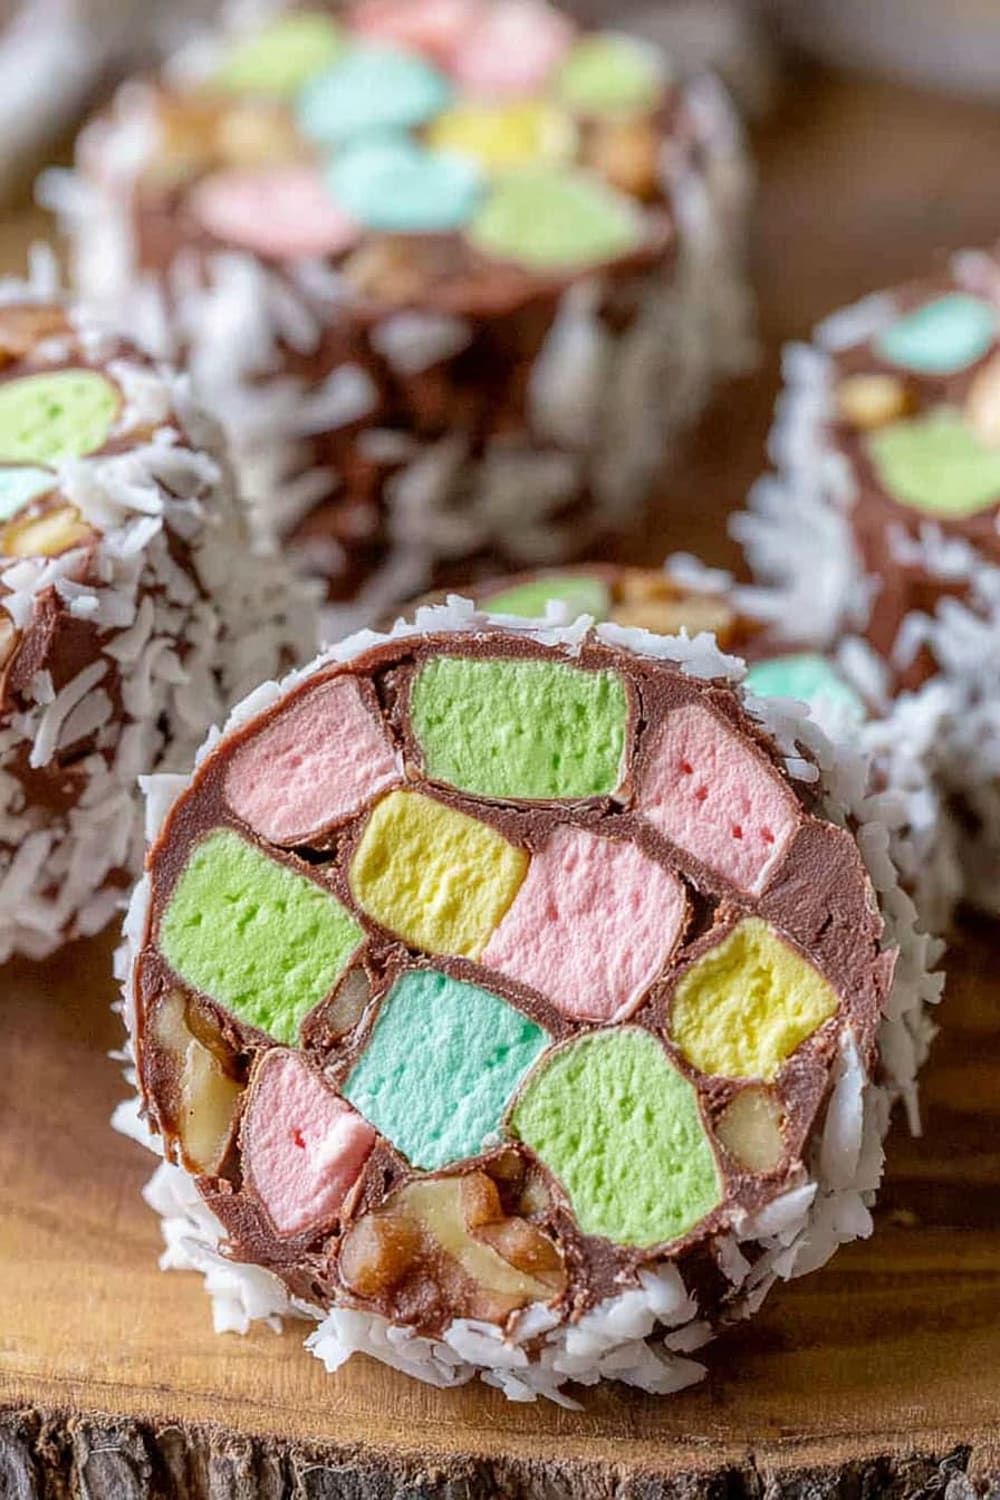
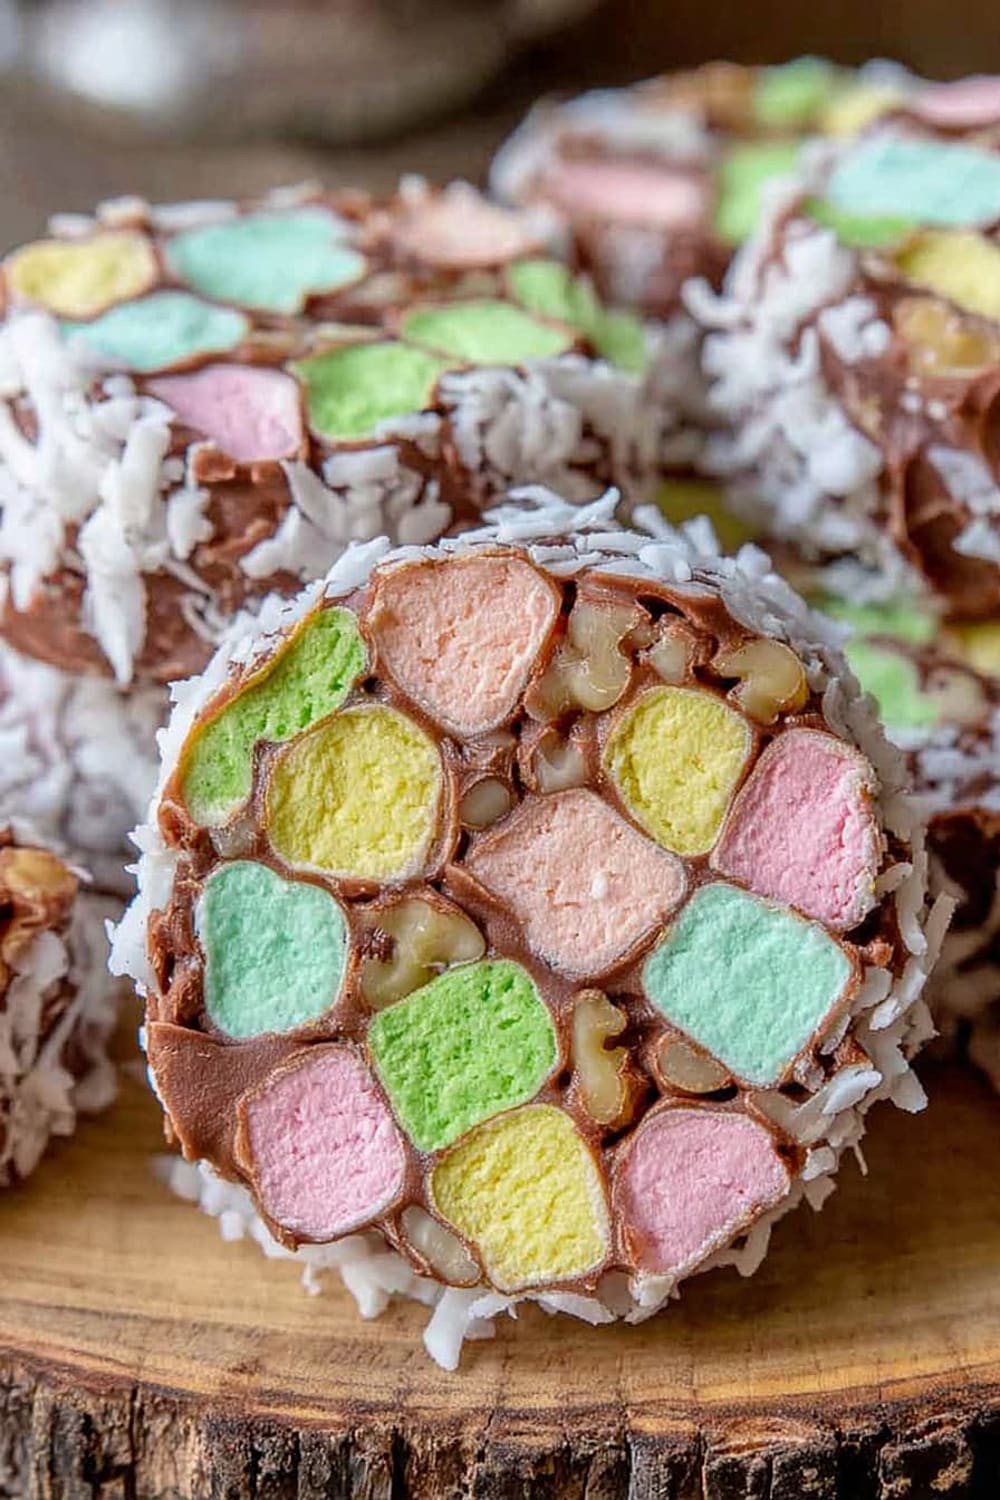
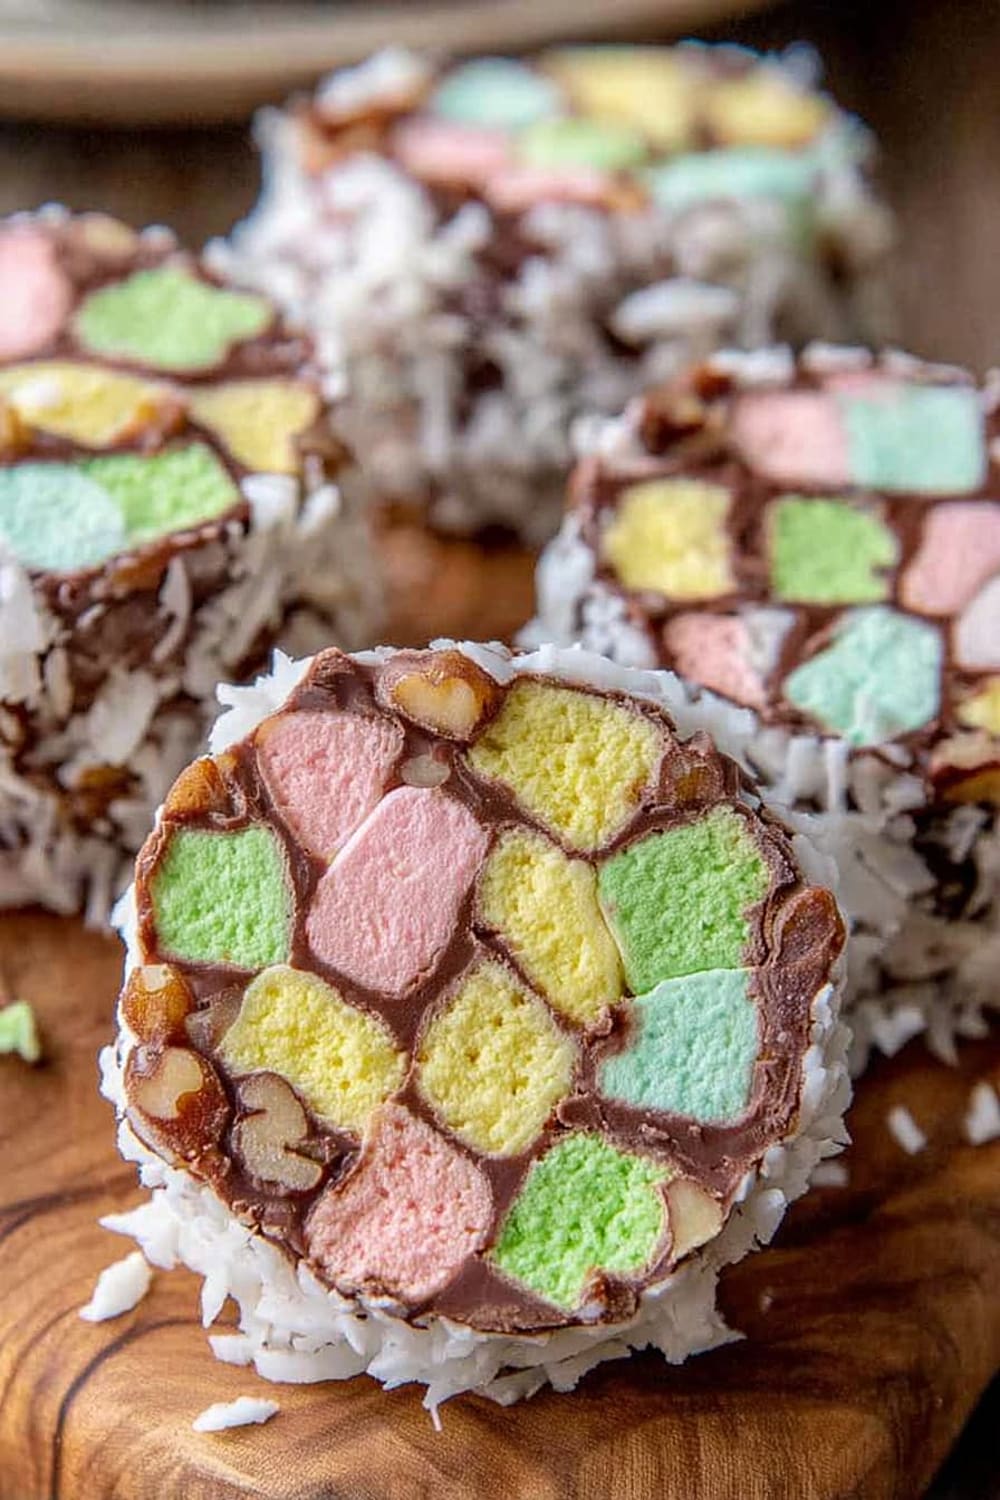
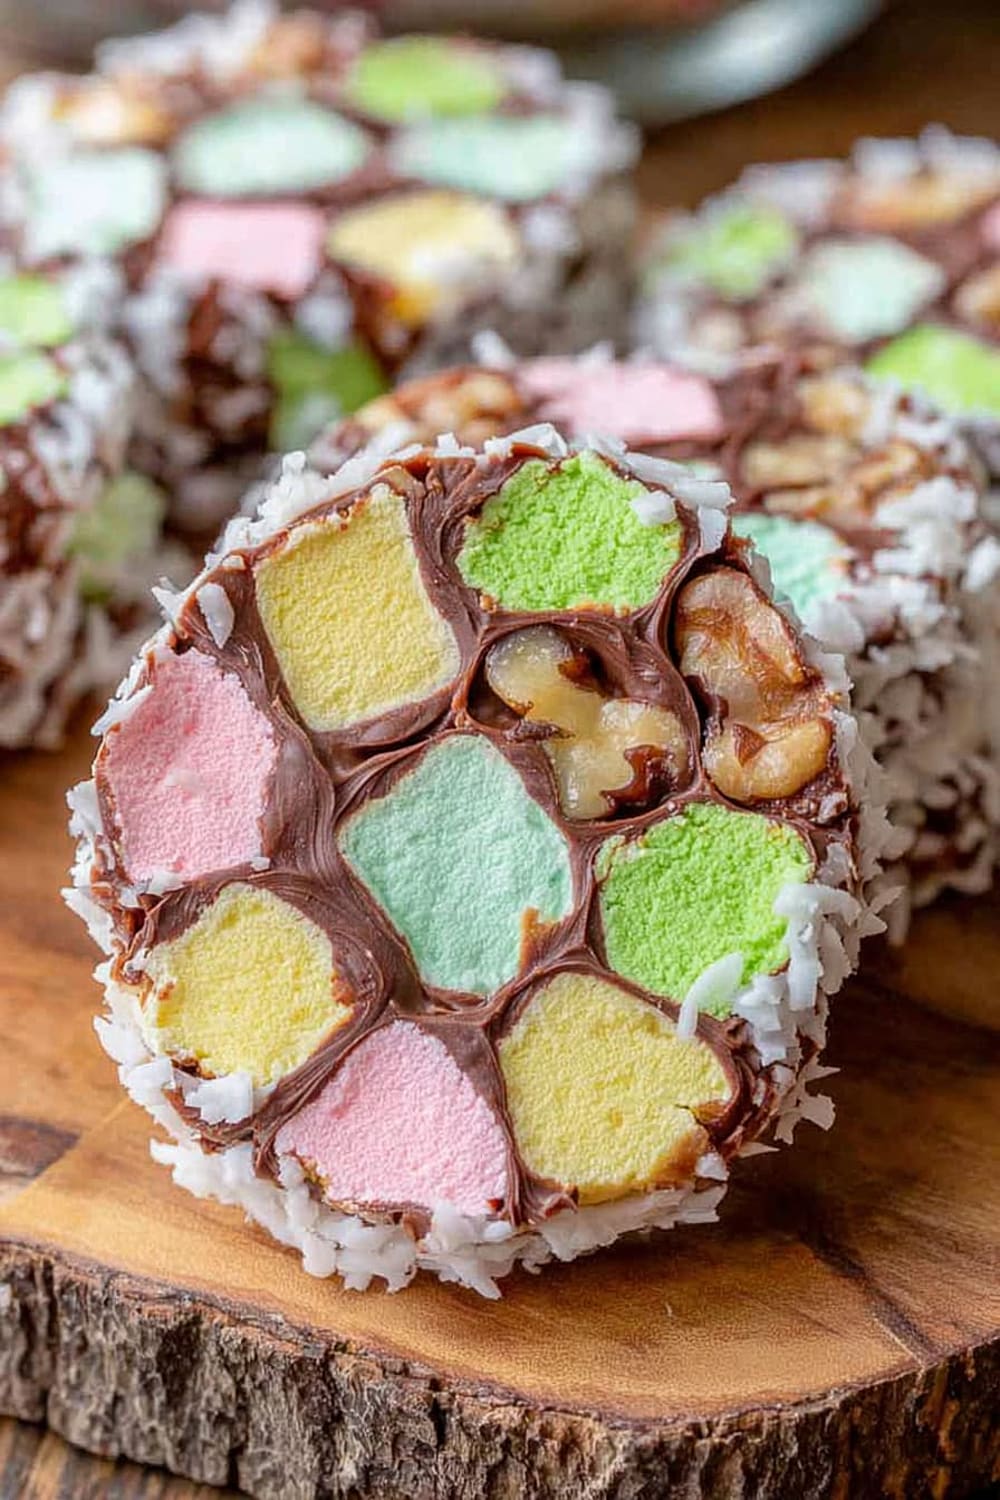
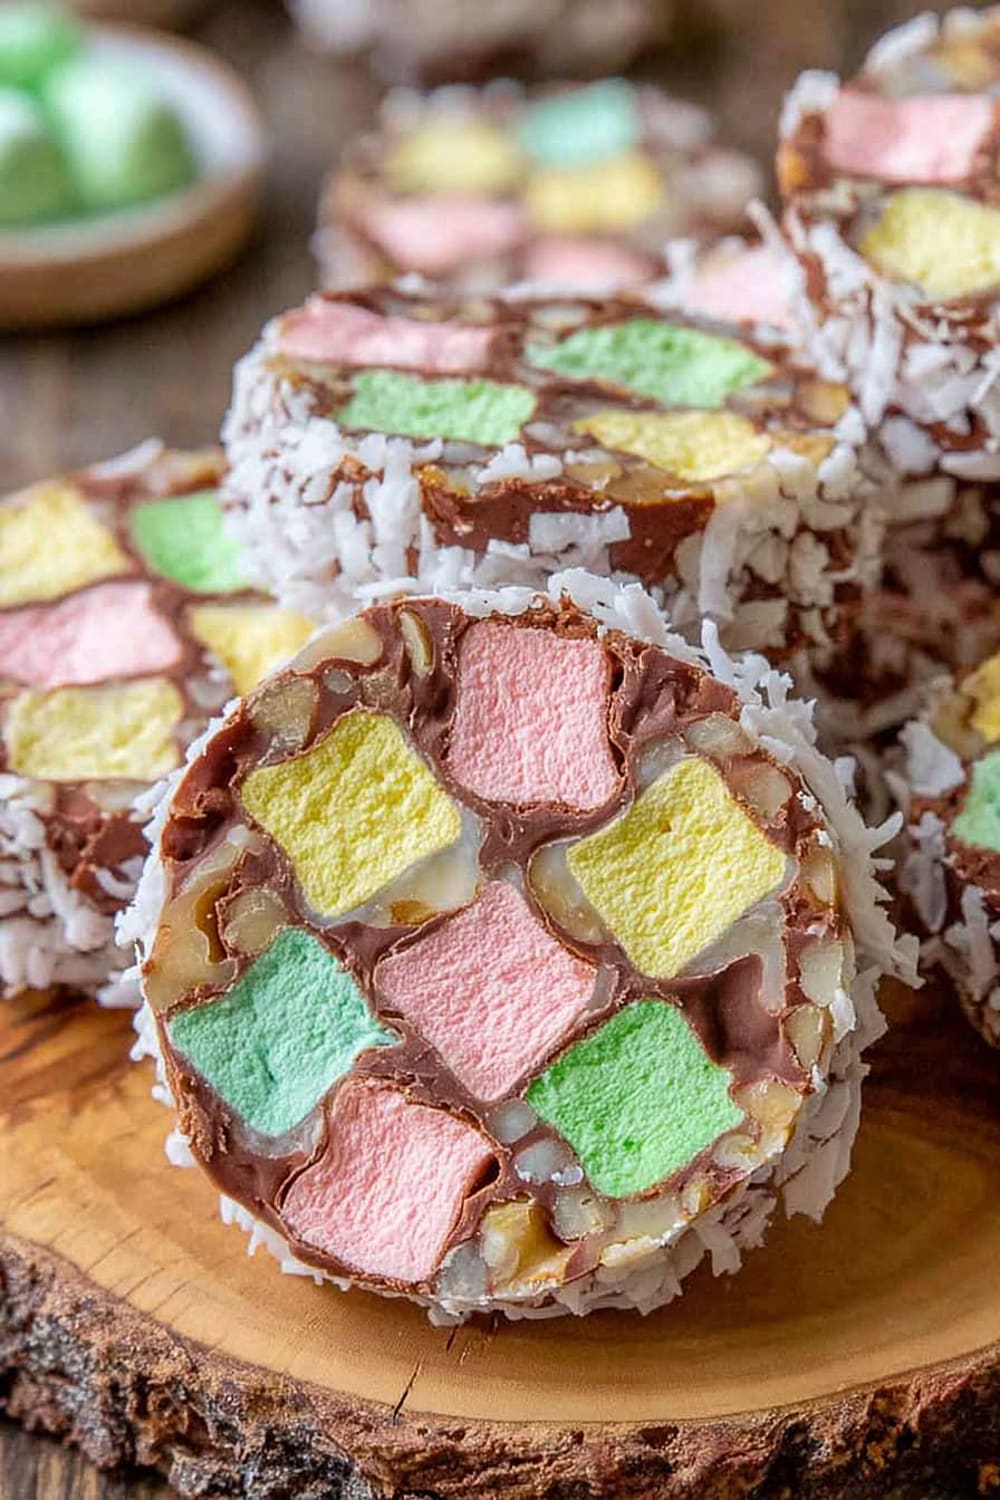
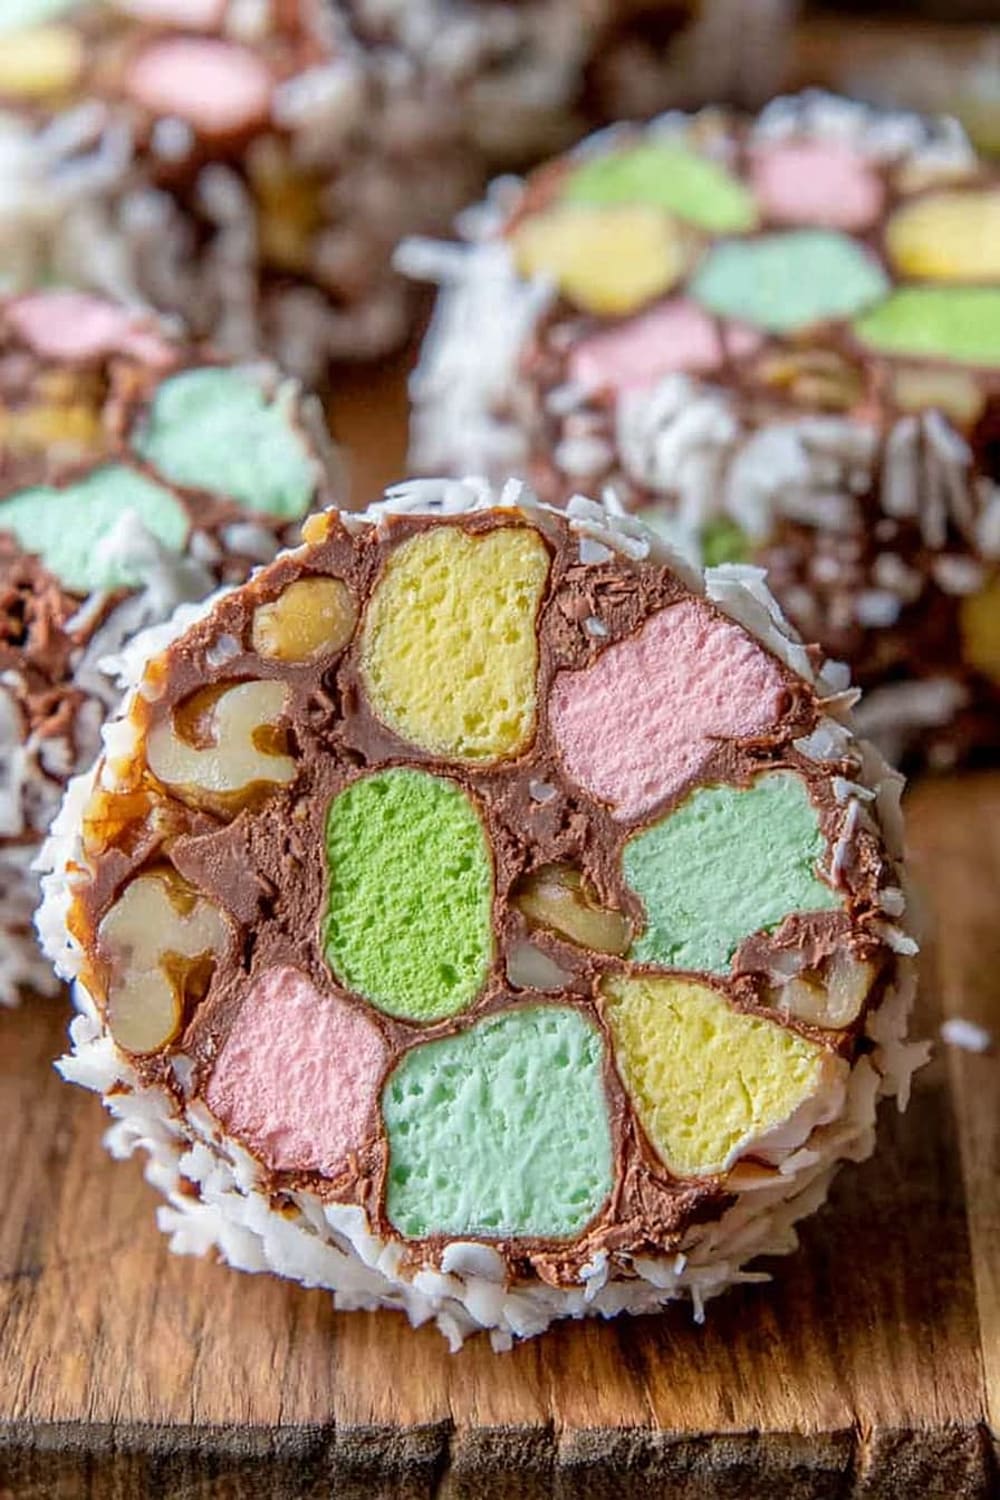
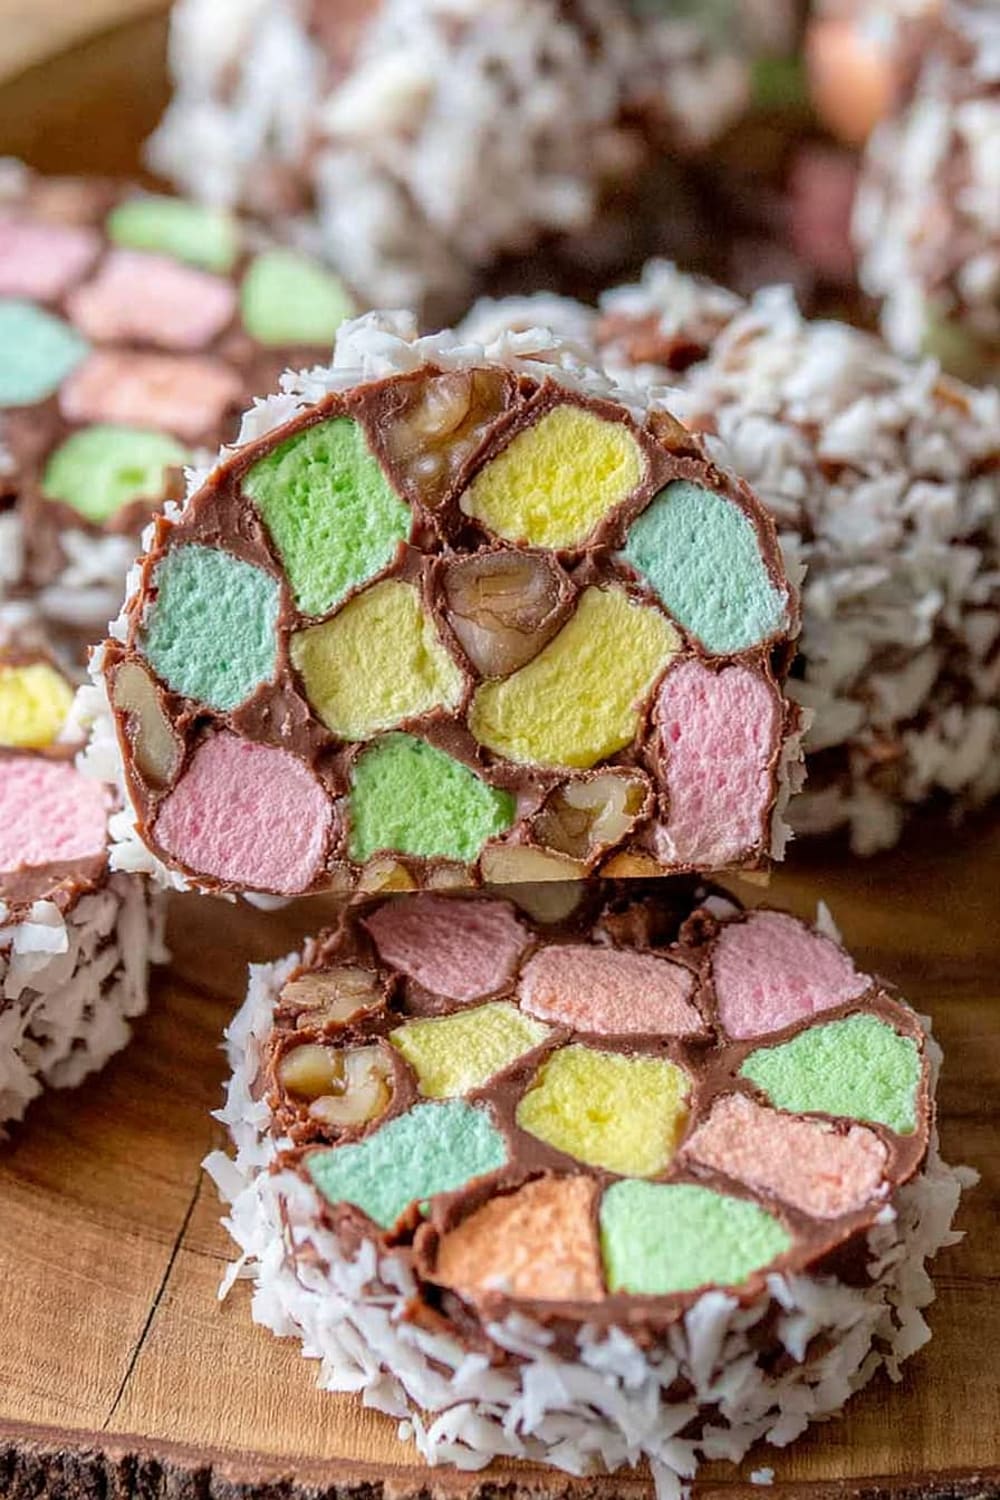
Picture this: chunks of rainbow marshmallows suspended in rich chocolate, rolled in coconut and sliced to reveal gorgeous “stained glass” windows that’ll have everyone asking for your recipe.
The best part is you literally can’t mess this up – there’s no rising, no precise temperatures, and no worrying about overbaking anything.
Just melt, mix, roll, and chill your way to cookies that look like they came from a fancy bakery but took you less than 15 minutes of actual work.
These beauties are perfect for holidays, bake sales, or any time you need to impress people but don’t want to stress-sweat through complicated techniques.
Fair warning: people are going to assume you spent hours on these, so feel free to accept all compliments graciously while secretly knowing you basically just stirred stuff together.
Ingredients
For the chocolate base
- ½ cup butter (1 stick, room temperature)
- 2 cups semi-sweet chocolate chips
For the filling
- 10 oz multi-colored mini marshmallows (one package)
- 1 cup chopped walnuts
For the coating
- 2 cups shredded sweetened coconut (one 7-oz package)
Instructions
Prepare the chocolate base
- 1 Place ½ cup butter and 2 cups chocolate chips in a medium saucepan over medium-low heat. Cook, stirring constantly with a wooden spoon or silicone spatula, until just melted and smooth. This should only take 1-2 minutes – don’t rush with higher heat or you’ll risk burning the chocolate.
- 2 Remove from heat and let the mixture cool for 10 minutes. This cooling step is crucial because hot chocolate will melt your marshmallows instead of coating them, and nobody wants marshmallow soup.
Combine the filling
- 3 While the chocolate cools, prepare your mini marshmallows and chopped walnuts by placing them in a large mixing bowl. Make sure your walnuts are chopped into small, uniform pieces for easier rolling and slicing later.
- 4 Once the chocolate mixture has cooled (it should feel warm but not hot when you test with your finger), pour it over the marshmallows and walnuts. Stir gently but thoroughly to combine, ensuring every marshmallow and nut piece gets coated in that gorgeous chocolate.
Shape the logs
- 5 Divide your 2 cups shredded coconut in half, spreading each portion down the center of a sheet of plastic wrap. You want each coconut portion to form a line about 12 inches long – this will be the base for your cookie logs.
- 6 Divide the chocolate marshmallow mixture in half and spread each portion down the length of the coconut on each sheet of plastic wrap. The mixture will be sticky, so work quickly but don’t worry about perfection.
Roll and chill
- 7 Use the plastic wrap to help you shape the chocolate marshmallow mixture into a log, rolling it so the coconut coats the outside completely. The plastic wrap makes this process much easier – just lift the edges and roll the mixture into a tight log shape. Repeat with the second sheet so you have two cookie logs, each about 2 inches in diameter.
- 8 Wrap each cookie log tightly with fresh plastic wrap, twisting the ends to seal. Refrigerate both logs for 2 hours minimum, or until completely firm. For best results, chill overnight.
Slice and serve
- 9 Using a sharp knife, slice the chilled logs into ½-inch thick pieces. Clean your knife between cuts for the cleanest slices – the chocolate can stick and make messy cuts if you don’t. Serve either cold directly from the refrigerator or at room temperature.
Recommended Equipment and Kitchen Tools
Recommended Tools (for best results)
- Medium saucepan with heavy bottom – prevents chocolate from scorching during the melting process
- Silicone spatula – won’t scratch your pan and makes stirring melted chocolate effortless
- Large mixing bowl – gives you plenty of room to fold marshmallows and nuts without making a mess
- Sharp chef’s knife – essential for clean, professional-looking slices through the chilled logs
Helpful Upgrades
- Kitchen scale – measuring chocolate chips by weight (12 oz) gives more consistent results than volume measurements
- Instant-read thermometer – helps ensure your chocolate mixture cools to the perfect temperature (around 100°F) before adding marshmallows
- Bench scraper – makes transferring the sticky mixture to plastic wrap much cleaner and easier
Nice-to-Have Options
- Parchment paper – lay under your workspace for easy cleanup of any chocolate drips
- Storage containers – airtight containers keep finished cookies fresh for up to a week
- Microplane grater – if you want to add fresh coconut instead of packaged, this makes quick work of whole coconuts
Recipe Variations and Dietary Modifications
Nut-Free Version
- Replace 1 cup walnuts with 1 cup mini chocolate chips or 1 cup crushed graham crackers
- Try 1 cup toasted sunflower seeds for crunch without tree nuts
- 1 cup dried cranberries or chopped dried apricots add chewy texture and fruity flavor
Flavor Variations
- White chocolate version: Substitute white chocolate chips for semi-sweet, add 1 teaspoon vanilla extract
- Peppermint twist: Add ½ teaspoon peppermint extract and use red and green marshmallows only
- Orange spice: Add 1 tablespoon orange zest and ½ teaspoon cinnamon to chocolate mixture
- Tropical version: Replace walnuts with 1 cup macadamia nuts and add 2 tablespoons dried pineapple
Coating Alternatives
- Chopped toasted almonds instead of coconut for nutty exterior
- Graham cracker crumbs mixed with 2 tablespoons sugar for s’mores vibes
- Crushed vanilla wafers create a cookie-like coating
- Powdered sugar for an elegant, snow-dusted appearance
Size Variations
- Make mini bites by forming smaller logs and cutting ¼-inch slices
- Create cookie bars by pressing mixture into 8×8 pan lined with parchment, then cutting into squares
- Truffle balls: Skip the log shape and roll mixture into 1-inch balls, then roll in coconut
Nutritional Information and Health Benefits
Key Nutritional Highlights
Each cookie contains approximately 216 calories, with 14g carbohydrates, 16g fat, and 3g protein. The combination of chocolate, nuts, and coconut provides sustained energy from healthy fats and natural sugars. These treats offer 2g fiber per serving, primarily from the walnuts and coconut.
Health Benefits of Main Ingredients
Walnuts provide omega-3 fatty acids, which support heart and brain health, plus 4g protein and essential minerals like magnesium and phosphorus. Dark chocolate (if using higher cacao content chips) contains antioxidants called flavonoids that may support cardiovascular health. Coconut offers medium-chain triglycerides (MCTs), which are easily metabolized for quick energy, plus 1.5g fiber per serving.
Dietary Considerations
Contains tree nuts (walnuts), dairy (butter), and soy (often found in chocolate chips). These cookies are naturally gluten-free since they contain no wheat flour. The 15g sugar per cookie comes from chocolate chips and marshmallows, making these an occasional treat rather than everyday snack. One cookie provides about 8% of daily recommended healthy fats from nuts and coconut.
Smart Swaps and Ingredient Substitutions
Common Substitutions:
- Semi-sweet chocolate chips → Dark chocolate chips (70% cacao) for less sugar and more antioxidants
- Butter → Coconut oil (solid, not melted) in equal amounts for dairy-free version
- Mini marshmallows → Marshmallow fluff (1½ cups) stirred in while chocolate is still warm
- Chopped walnuts → Pecans, almonds, or hazelnuts in equal amounts
Budget-Friendly Swaps:
- Premium chocolate chips → Store-brand chocolate chips work perfectly for melting
- Fancy shredded coconut → Basic sweetened coconut from baking aisle saves money
- Fresh walnuts → Frozen walnut pieces (thawed and drained) cost significantly less
Pantry Emergency Substitutions:
- Mini marshmallows → Regular marshmallows cut into quarters with kitchen shears
- Shredded coconut → 1½ cups chopped almonds or graham cracker crumbs
- Chocolate chips → 8 oz chopped chocolate bar plus 2 tablespoons sugar
Pro Tips for Substitutions:
- Store coconut in freezer to prevent rancidity and extend shelf life up to 6 months
- When using coconut oil instead of butter, chill logs an extra 30 minutes for proper firmness
- Nut substitutions work best when pieces are similar size to chopped walnuts for even distribution
Make It Diabetes-Friendly
Sugar Substitutions:
- Replace 2 cups chocolate chips with sugar-free chocolate chips (Lily’s or ChocZero brands)
- Use sugar-free marshmallows (available at health food stores) to eliminate 12g sugar per serving
- Choose unsweetened coconut flakes instead of sweetened to save 3g sugar per cookie
Carb Modifications:
- Reduce marshmallows to 6 oz and increase walnuts to 1½ cups for 8g fewer carbs per cookie
- Add 2 tablespoons chia seeds or ground flaxseed for fiber that helps slow sugar absorption
- Use 85% dark chocolate instead of semi-sweet to reduce sugar by 4g per serving
Portion & Timing Tips:
- Cut slices ¼-inch thick instead of ½-inch to create 48 smaller cookies at 108 calories each
- Pair with 1 tablespoon almond butter or 2 oz cheese to balance blood sugar response
- Modified carb content: Approximately 8g net carbs per small cookie with sugar-free substitutions
Total Carb Reduction: These modifications reduce carbs from 14g to 8g per serving while maintaining the signature colorful appearance and satisfying texture.
Perfect Pairing Suggestions
Beverage Pairings
Coffee pairs beautifully with the chocolate and coconut flavors – try a medium roast or flavored varieties like hazelnut or vanilla. Black tea or chai complement the sweet, nutty profile without competing. For wine lovers, a port or dessert sherry echoes the rich chocolate notes, while prosecco provides refreshing contrast to the dense sweetness.
Holiday Menu Integration
These cookies shine on Christmas cookie platters alongside sugar cookies and gingerbread, adding color and no-bake convenience to your spread. They’re perfect for Easter celebrations with their pastel marshmallow “stained glass” appearance. Thanksgiving dessert tables benefit from their make-ahead convenience – prepare days in advance while focusing on pies and other baked goods.
Complete Dessert Experience
Serve alongside vanilla ice cream for temperature and texture contrast, or create a cookie and coffee bar with multiple coffee varieties and flavored creamers. For children’s parties, pair with chocolate milk or fruit punch. Adult gatherings call for dessert wines, coffee liqueurs, or hot chocolate spiked with peppermint schnapps.
Seasonal Presentations
Winter: Dust with powdered sugar for snowy effect. Spring: Use pastel marshmallows only. Summer: Serve chilled with lemonade. Fall: Add cinnamon to chocolate mixture and pair with apple cider.
Pro Tips and Troubleshooting
Temperature Control Secrets
The 10-minute cooling period isn’t optional – chocolate that’s too hot will melt marshmallows into gooey strings instead of maintaining their shape. Test temperature by touching the bottom of the pan; it should feel warm, not hot. If you accidentally overheat, stir in 1 tablespoon room temperature butter to cool mixture faster.
Rolling and Shaping Mastery
Wet hands slightly when handling the sticky mixture – this prevents it from sticking to your fingers. Roll logs on a flat surface rather than trying to shape them in the air. If mixture seems too soft to roll, refrigerate for 15 minutes first, then shape. Uniform pressure while rolling ensures even slicing later.
Storage and Make-Ahead Strategies
These cookies actually improve after 24 hours as flavors meld together. Store in airtight containers with parchment paper between layers for up to 1 week refrigerated or 3 months frozen. Freeze whole logs wrapped in plastic, then slice as needed – they slice beautifully while still frozen.
Troubleshooting Common Issues
Crumbly logs: Chocolate was too cool when mixed; gently rewarm and remix. Melted marshmallows: Chocolate was too hot; start over with proper cooling time. Uneven slices: Use dental floss instead of knife for cleaner cuts through sticky areas. Coconut won’t stick: Press firmly while rolling and ensure mixture is still slightly warm.
These Church Window Cookies prove that the most impressive-looking treats often require the least actual skill – just patience, good timing, and the confidence to accept compliments like you totally meant for them to turn out this gorgeous. Now go forth and let people think you’re a baking wizard while you secretly know you just stirred some stuff together and waited for the fridge to do the real work.